Welcome, Guest. Please login or register.
November 21, 2024, 08:15:01 PM

Login with username, password and session length
* Home Help Arcade Login Register
.
+  Forum
|-+  **Reel Slots** Gaming Machines
| |-+  WMS Reel Games. (Moderator: knagl)
| | |-+  WMS 40x Dotmation Upper (& BOTH upper/lower) Power Supply Replacement Solutions
0 Members and 2 Guests are viewing this topic. « previous next »
Pages: [1] Go Down Print
Author Topic: WMS 40x Dotmation Upper (& BOTH upper/lower) Power Supply Replacement Solutions  (Read 20751 times)
knagl
Global NLG Site Moderator
Sr.Tech NLG Member 1000+ Post
*

Total Karma Storms: 642
Offline Offline

Gender: Male
Posts: 5489


Kevin


« on: September 16, 2008, 05:52:44 AM »

The first two posts here provide an option for replacing the upper Dotmation power supply that is prone to failure.  There have been a few solutions posted over the years.  Later in this thread, CFH posted his great solution for replacing BOTH the lower and upper power supplies with just one ATX computer power supply.  If just your upper (DMD) supply is bad, the solution from the first two posts is less labor intensive and you don't have to modify any of the factory wiring.  If your lower power supply is bad, follow CFH's post for a solution that will fix both supplies for good.


Originally posted by Azslot.com on 6/24/2006
Quote
The Cheapest and most reliable replacement power supply you will find to use for the WMS dotmation is an ATX power supply from a PC. Actually ANY supply that puts out 8 to 10 Amps on the 12VDC side will work fine. You probably even have an old ATX supply laying around somewhere from that old PC that you don't use anymore. Now you can be a good citizen and Recycle it and put new life and reliability into your machine. We have been using cheap ATX supplies for the WMS dotmation machines and I honestly cant remember any that ever failed again after replacement! Wanna know why? Because they have cheap fans built into them which keep them relatively cool. The main cause of most any switching power supply failures can be traced to TOO MUCH HEAT...+ the lack of any air circulation or air flow at all which is what happens when you have no  fan to move the air.....DAH!!! HELLO!! Whats wrong with these game designers? As clever and creative as they can be I wonder what planet they came from with p/s that has no way to cool itself. Add a metal enclosure box, a florescent light fixture and basically you have alot of problems!.
Both the dot display and the dot controller need 12VDC to run and will draw about 8amps (or less). Now before you ask...Heres how its wired up: (Older ATX supplies may slightly differ but you will get the idea)
1st remove the factory WMS dotmation p/s thats screwed in the metal dotmation box and throw it as far as you can! (Preferably at someone you don't like or care for.)
The ATX p/s has several connector plugs with groups of wires coming from each plug. First locate the largest connector plug with the most wires in it and Cut and strip the units power on wire (this is usually gray colored and about 4 wires from the end) Then cut any 1 of the black colored ground wires in the same large molex connector. Connect these 2 together.  Note: If you have a white colored wire in this connector on the opposite side of the gray wire that you cut you will need to also cut it and also splice it in with the other 2. With that done your p/s should come on along with the rest of the machine when it is powered on from the switch. (Unless you screw something up)
For the WMS Dotmation application you will only be using the 12VDC connections coming from the replacement unit.  The 5VDC or the -12VDC or any other wiring wont be used here. With that in mind plug any of the 4 pin molex pigtail connectors directly into your dotmation display. - Should plug right in but you need to cut the RED wire since the display doesn't use 5VDC. Now cut the RED and black wires coming from your dot controller board and splice into any yellow and black wires coming out of replacement supply. Red coming out of controller goes to yellow in supply and Black to black. Now plug your AC power cord into p/s and route cord down behind the reels and plug it into either of the 2 plugs in the main supply below the reels. Thats it! Double check all connections and you're done...If all went well the unit will power up at same time as rest of machine using the switch. Hope this helps someone down the road. I think its time for a drink now ...


I walked a friend through this via e-mail -- here is my "translation" of the above post, which explains how to do the conversion with no damage/modification to the original factory wiring on the WMS machine:

(See the next post)

« Last Edit: January 22, 2011, 05:01:33 AM by knagl » Logged

If you find this site helpful, please consider making a small donation to help defray the cost of hosting and bandwidth.

Please do not PM me for support or "how to" requests -- please post your request in the forum so that everyone may assist you and everyone can benefit from the answer to your question!  Thanks! Smiley
knagl
Global NLG Site Moderator
Sr.Tech NLG Member 1000+ Post
*

Total Karma Storms: 642
Offline Offline

Gender: Male
Posts: 5489


Kevin


« Reply #1 on: September 16, 2008, 05:55:06 AM »

(Continued from previous post)

- Buy a cheapie ATX power supply.  The original WMS power supply was rated for 9 amps, so make sure that the +12V output on the power supply is rated for at least 9 amps.

- For the display itself, select any of the rectangular 4-pin molex connectors from the ATX supply.  Snip off the red wire (+5v, which you don't need or want going to the display).  Insulate (electrical tape or the like) that wire you just snipped so the wire doesn't touch any metal inside the top of the machine.  Plug the connector into the back of the Dotmation display.

- For the processor board inside the Dotmation box, you're going to use the square 4-pin connector from the ATX supply (the one with the two black wires, and the two yellow with black stripe wires), but, ***VERY IMPORTANT*** DO NOT JUST PLUG IT IN!  THE WIRES ARE REVERSED FROM WHAT YOU NEED!  If you look at the original WMS harness that plugged into that processor board, you'll see that the black (common/ground) wires are in the opposite place as the ATX wires.

Snip all four wires going to the square connector, leaving enough room to be able to strip and re-connect wires to that connector.  Reverse the wires.  Connect black to yellow, black to yellow, and yellow to black, yellow to black.  The end result is that your black wires from the ATX supply will now go where the black wires from the factory harness went, and the yellow (+12v) wires will go to where the red (+12v) wires from the factory harness went.  Once you've done that switch-a-roo, you can plug in the square connector into the processor board.

- On the large 24-pin connector, snip off the gray wire, the green wire, and any two black wires (pins 8, 16, and any two black wires -- 17 and 18 are fine).  Jump (connect) the gray wire together with one of the black wires.  Jump the green wire to the other black wire.

That's it.  Once you plug in the power supply, the Dotmation screen should come to life.

You can plug in the ATX supply to one of the outlets on the side of the lower power supply -- then it will turn on and off with the machine.  If you want, you could snip the connector off the original power wires going to the Dotmation box (the green, white, and black wires) and add an outlet in the top box of the machine to plug in the ATX up there.

I would suggest using velcro or double-stick foam tape or something on the ATX supply to prevent it from sliding around when the game is moved.


Originally posted 9/7/2007

I'm slightly dejected.

I cut all my wires, spliced everything together that needed splicing, plugged everything in, and... nothing.   hissy fit

I don't think the power supply is coming on, though.  The switch is on, and I've even tried plugging it directly into a working wall outlet.  The fan on the power supply never spins up.

Ideas, please?  I was hoping that some magic would happen when I plugged it all in, but instead, still "dot fail".


FIXED!!   applause

I did some digging on the web.  I needed to have the green wire in the 24-pin connector spliced with one of the ground (black) wires from the 24-pin connector.  Did that and the darn thing came to life!  Pictures soon!   applause


The best part is that I didn't have to hack up the factory harness at all -- it's still 100% intact, should I ever decide to switch to a factory power supply (no need to at this point, but still).  The +12V2 4-pin connector that came with the ATX power supply is the same style as the connector that plugs into the Dotmation processor board.  As such, I was able to hack that off the ATX, attach the correct wires to it in the correct places, and then use that to plug into the board, while using one of the "hard drive" molex plugs to power the Dotmation display.  No hacking of the factory wires necessary at all.
« Last Edit: January 22, 2011, 05:16:03 AM by knagl » Logged

If you find this site helpful, please consider making a small donation to help defray the cost of hosting and bandwidth.

Please do not PM me for support or "how to" requests -- please post your request in the forum so that everyone may assist you and everyone can benefit from the answer to your question!  Thanks! Smiley
cfh
Contributing Gold NLG Member
NLG Member 101 to 500 Post
*

Total Karma Storms: 113
Offline Offline

Posts: 458


WWW
« Reply #2 on: September 18, 2008, 10:22:07 PM »

Re-post from the old site...
Old tittle:
One new Computer Power Supply solves TWO dotmation P.S. problems

I did a post on how to replace the lower power supply with a new computer
power supply. And how to replace the upper dotmation power supply with
a new video game style switching power supply.

But why not just replace *both* the original upper and lower power supplies
with a single computer power supply?

This is actually pretty easy. If you read my post on how to implement a
computer power supply for a dead original lower power suppy, you
are 7/8th the way to using this same computer power supply for
the upper dotmation boards too.

Parts Needed.
---------------
(1) Amp/Tyco 4 pin connector housing #1-480-426-0 (mouser# 571-14804260)
(2) Amp/Tyco male connector pins #60620-1 (mouser# 571-606201)
(1) Extra long 8 pin Molex male header pins# 10-01-2270 (or 09-62-6104 or 09-52-3102).
(2) two inch long 18 gauge wire
(1) inch of 3/4" diameter heat shrink tubing

STEP ONE.
Implement a new 250 watt or higher ATX computer power supply
as a replacement for the original lower Wms power supply. In this
example I'm using an ATX P.S. with 12 volts at 13 amps and 5 volts
at 22 amps. That's probably about the bare minimum. (Ideally
12 volts should be at 15 amps.)
See the post below for instructions on how to implement
a computer power supply as a replacement for the stock
Wms lower power supply:
http://newlifegames.net/techforum/index.php?topic=7324.0

STEP TWO.
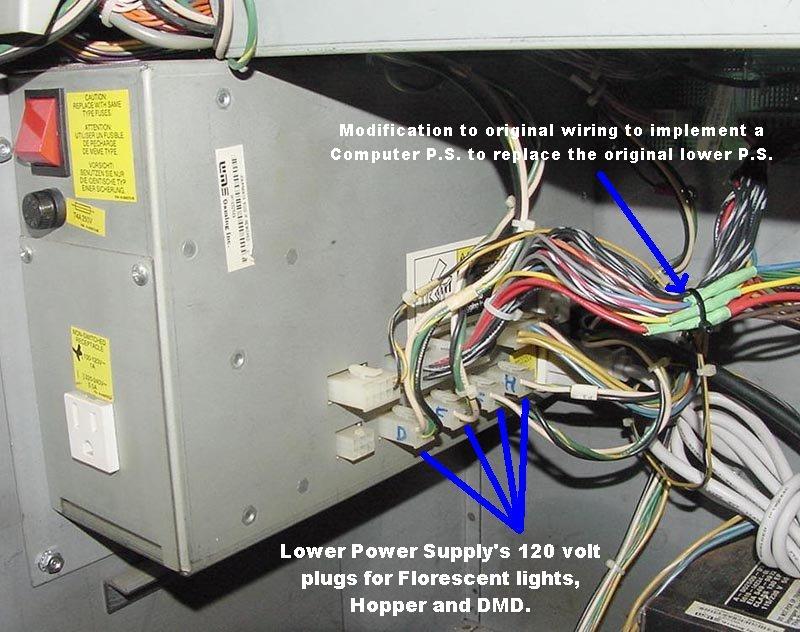
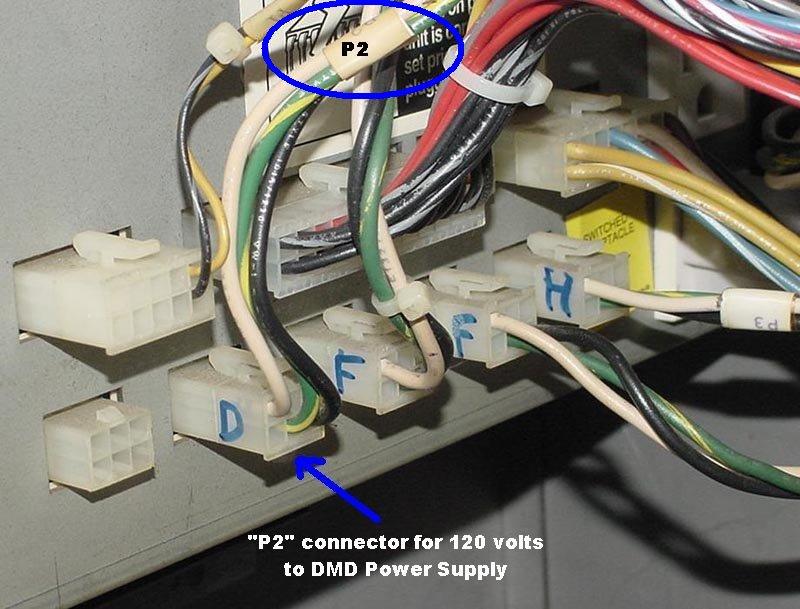
Find the 120 volt power connector for the upper dotmation
power supply. On the side of the lower power supply, there
are two rows of connectors. The bottom row has five connectors,
all with 6 pins. These are 120 volt connectors for powering the
two florescent fixtures, the hopper, and the upper dotmation
power supply. Find the connector labeled "P2", which is power
for the upper dotmation power supply. Remove this connector
and power up the slot. A "Dot Fail" message should appear
on the red LED displays.


STEP THREE.
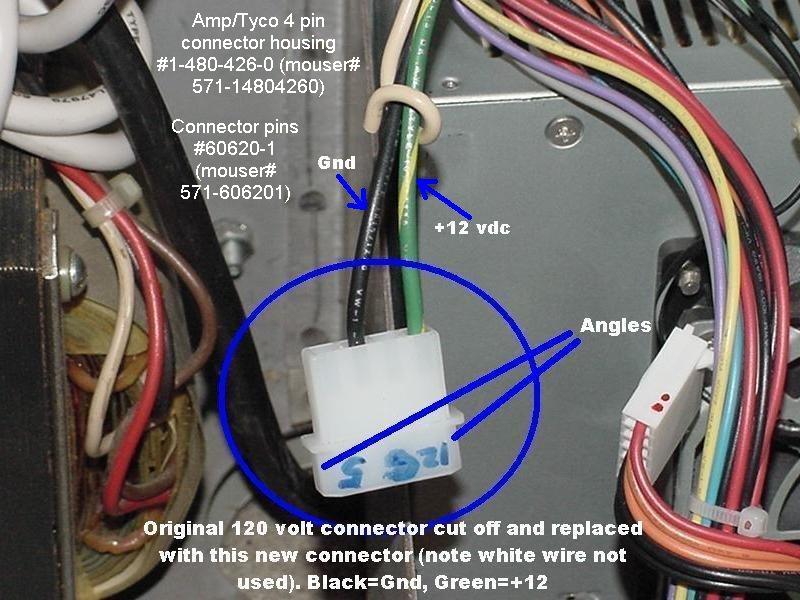
With the slot power turned off, cut off the 6 pin connector "P2"
with three wires (black, white, green)
going to the lower power supply. (This connector is the wiring
going to the upper DMD {dot matrix display} power supply.)
Using a Molex crimping tool, crimp new Amp male connector
pins onto the black and green wires. (Ignore the white wire, it
will not be used.) After the pins are crimped, insert them into
the new Amp connector housing as shown in the pictures below.
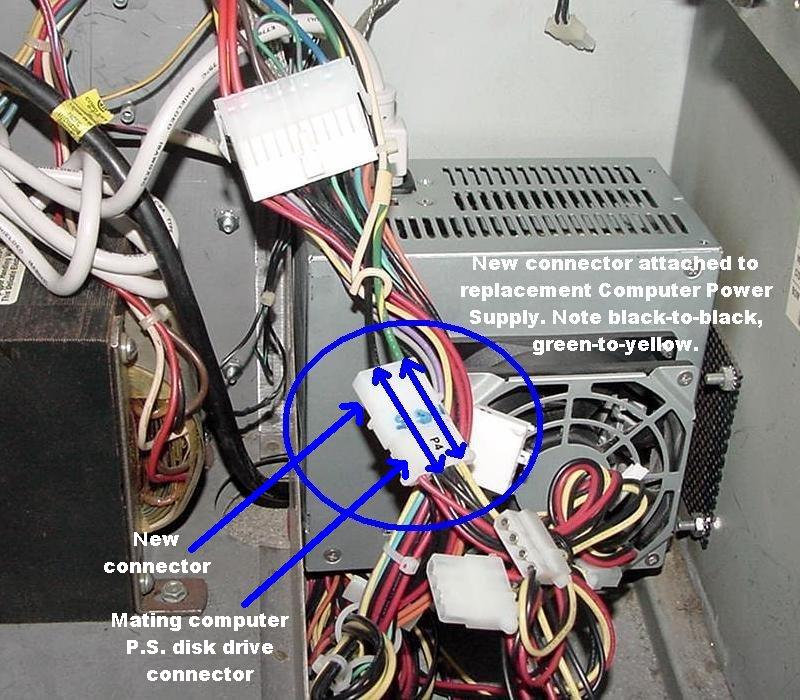
BE CAREFUL. The original green wire must mate with the
computer power supply's yellow (12 volt) wire. And the original
slot wiring black wire must mate with the computer
power supply's black wire. Don't screw this up or you can ruin
the DMD controller and DMD display. Plug this new connector
into one of the disk drive connectors on the newly installed
computer power supply.


STEP FOUR.
Remove the top glass so access to the Dot Matrix "can" may be
allowed. Remove the top two screws and fold the DMD panel
down and out of the way. Notice the original Dotmation power
supply at the right - there are two .156" molex connectors
(one 5 pin, one 13 pin) at the bottom of the power supply.
Unplug these two connectors from the original Dotmation
power supply.

Using the extra long male 8 pin Molex header pins, modify it
with two pieces of wire. One wire will connect the two outside
+12 volt pins together. Another wire will connect the inside ground
pins are together (see picture below).  Cut off three male
pins on one side of this connector too. (Again see picture
below.)  Using a DMM set to continuity, make sure the +12 and Gnd
pins are not shorted, because that would be easy to do if your
soldering skills aren't up to par when attaching the wire to the
male/male adaptor.

When done, it's a good idea to encase the jumper wires with
some 3/4" heat shrink tubing (or electrical tape). This would prevent
the male/male connector from shorting out against the Dot Matrix
metal "can".

Plug this male/male adaptor into the power connectors
for the DMD. (Again see two pictures below.) Note that the green
power wire mates to the red DMD connector wire, and the black
power wire mates to the black DMD connector wire.
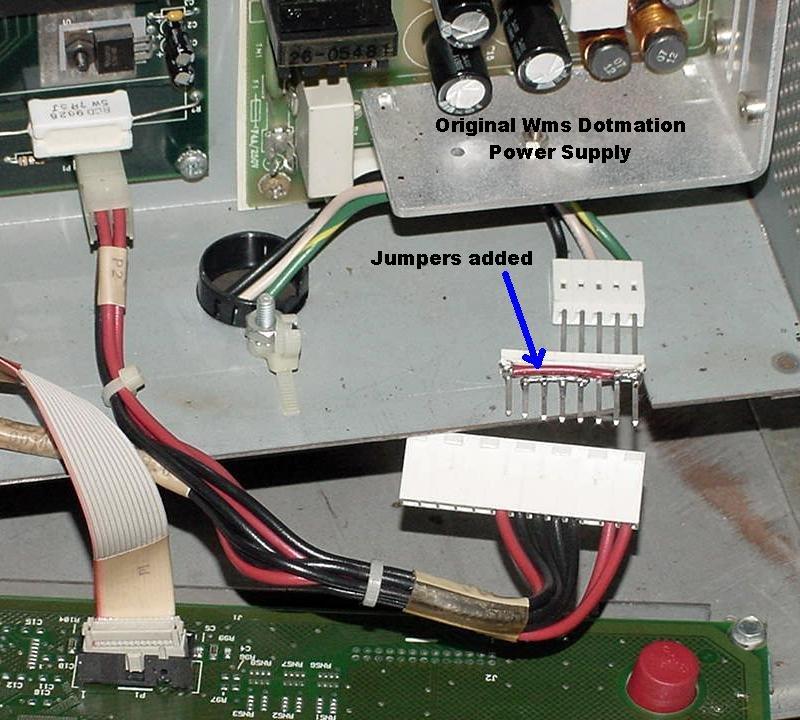
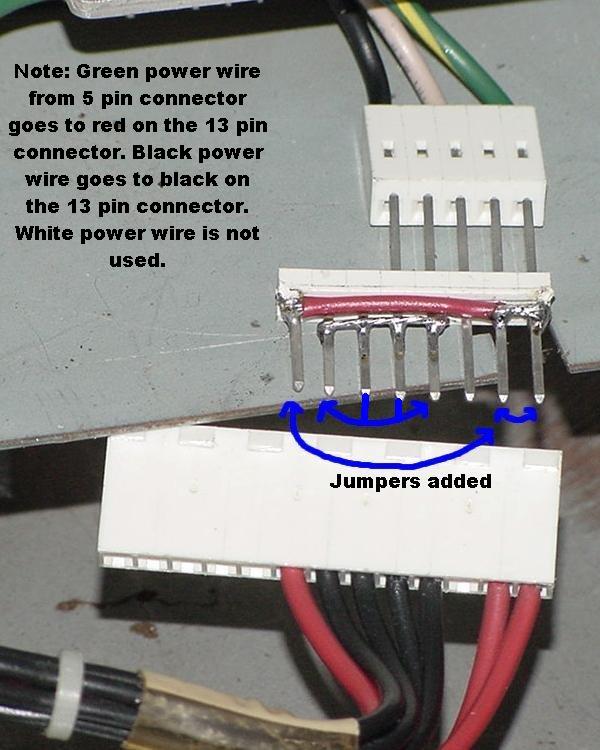
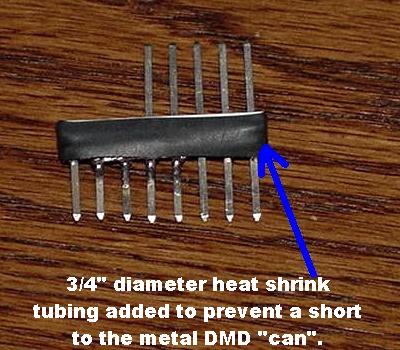


Another method to hook up the computer power supply
to the original Dotmation power harness. This uses a .156" Molex
header pin as the "mate" to the original Dotmation harness
(instead of the male/male .156" adaptor). This permanently alters
the original "feed" harness, and is shown in the picture below.
I use this technique when making a new power feed harness.
The main disadvantage to this is when feeding the assembly
into the metal dotmation "can", it has to be done "backwards"
(because the mating 8 pin connector is often too wide to fit through
the dotmation can wire hole).
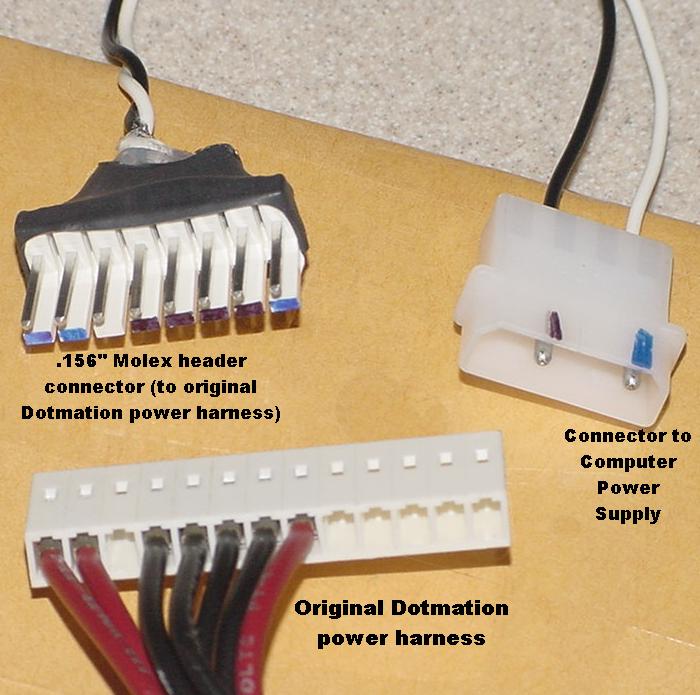
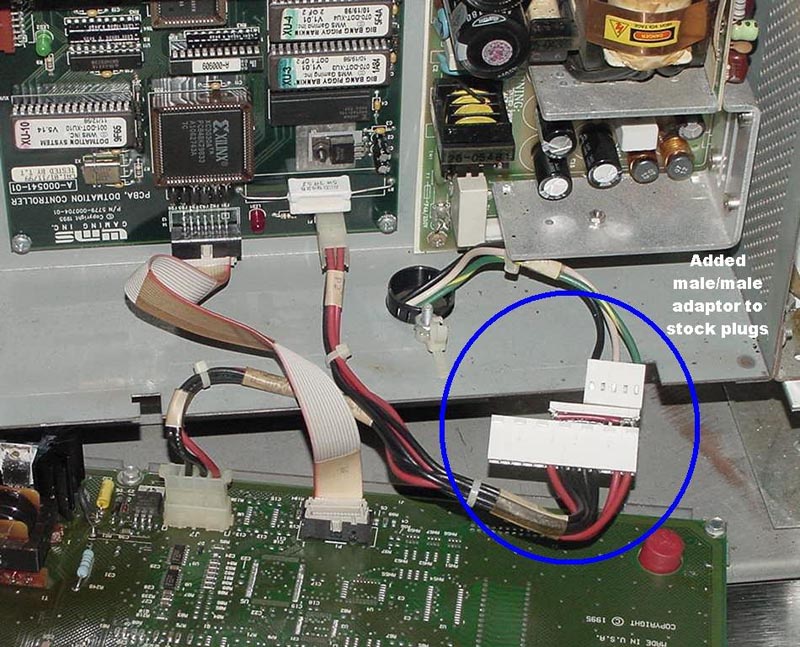
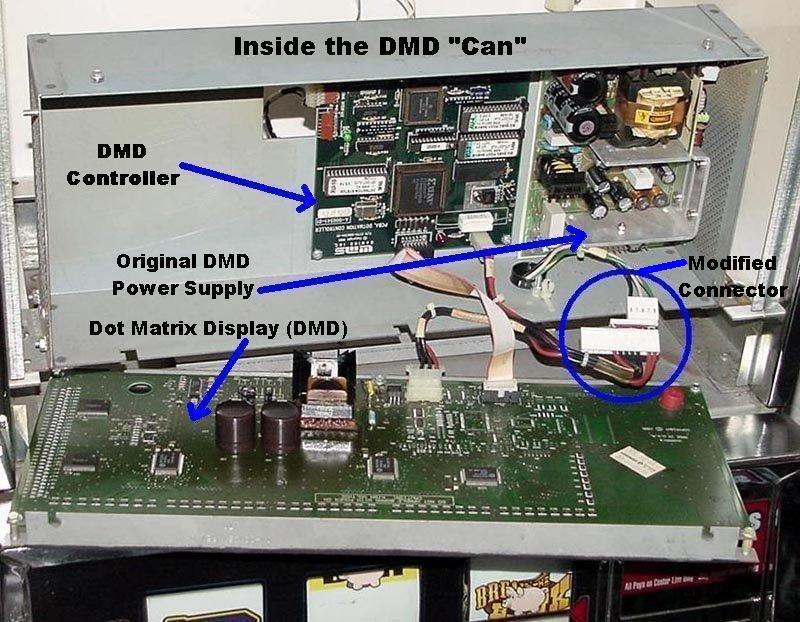


ALL DONE.
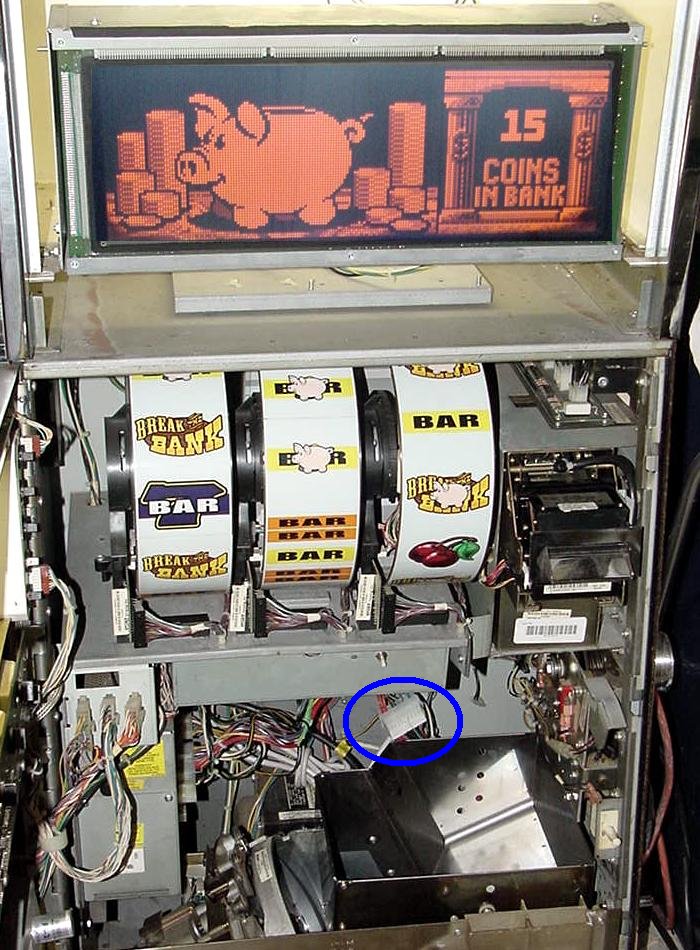
Power up the slot with the new computer power supply, and all
should work fine. Below is a Big Bang Piggy Bankin runing with
a 250 watt power supply for both the upper and lower power
supplies.  The blue circle in the picture below shows the large
ATX style connector that is implemented for the lower power
supply.

« Last Edit: January 27, 2009, 12:29:05 PM by StatFreak » Logged
Randy0777
Contributing NLG Member
Sr.NLG Member 501 to 1000 Post
*

Total Karma Storms: 311
Offline Offline

Gender: Male
Posts: 561


« Reply #3 on: May 15, 2009, 02:30:23 PM »

Just ran across this post( maybe because I never had a WMS 400 before). It took me like 15 mins to do this,plus two fans . You guys ROCK!!! Hail
Logged
knagl
Global NLG Site Moderator
Sr.Tech NLG Member 1000+ Post
*

Total Karma Storms: 642
Offline Offline

Gender: Male
Posts: 5489


Kevin


« Reply #4 on: May 19, 2009, 07:33:53 PM »

Excellent - glad it helped!   applause
Logged

If you find this site helpful, please consider making a small donation to help defray the cost of hosting and bandwidth.

Please do not PM me for support or "how to" requests -- please post your request in the forum so that everyone may assist you and everyone can benefit from the answer to your question!  Thanks! Smiley
tacman
NLG Document, Media Gallery and FAQ Writer
Sr.Tech NLG Member 1000+ Post
*

Total Karma Storms: 446
Offline Offline

Gender: Male
Posts: 1537


Genius in training.


« Reply #5 on: May 19, 2009, 08:26:43 PM »

And thanks to cfh for reposting this convrsion!  Hail

 Dan (tacman)
Logged

rilaw
Contributing NLG Member
NLG Member 101 to 500 Post
*

Total Karma Storms: 17
Offline Offline

Gender: Male
Posts: 266


An Addiction:)


« Reply #6 on: January 30, 2011, 12:13:45 AM »

Great Job!  applause Took me just a few min to get my X Factor DMD up and running, love this site!   Hail  applause  Clap Dancing Party  bunny dancing

« Last Edit: January 30, 2011, 12:19:03 AM by rilaw » Logged
knagl
Global NLG Site Moderator
Sr.Tech NLG Member 1000+ Post
*

Total Karma Storms: 642
Offline Offline

Gender: Male
Posts: 5489


Kevin


« Reply #7 on: January 30, 2011, 11:02:39 AM »

Looks sharp, rilaw!   Clap

Did you do the upper-only replacement, or the lower/upper one?  (I'm guessing the upper-only, as the other one takes more than 'a few minutes' to do!)

K+ for posting a picture of your great looking game.
Logged

If you find this site helpful, please consider making a small donation to help defray the cost of hosting and bandwidth.

Please do not PM me for support or "how to" requests -- please post your request in the forum so that everyone may assist you and everyone can benefit from the answer to your question!  Thanks! Smiley
rilaw
Contributing NLG Member
NLG Member 101 to 500 Post
*

Total Karma Storms: 17
Offline Offline

Gender: Male
Posts: 266


An Addiction:)


« Reply #8 on: January 30, 2011, 12:06:39 PM »

Looks sharp, rilaw!   Clap

Did you do the upper-only replacement, or the lower/upper one?  (I'm guessing the upper-only, as the other one takes more than 'a few minutes' to do!)

K+ for posting a picture of your great looking game.

I just did the upper because someone wrote a date and their name on the lower power supply, so I figured it was rebuilt, and only the upper was toast.  Thanks again, good work!
Logged
knagl
Global NLG Site Moderator
Sr.Tech NLG Member 1000+ Post
*

Total Karma Storms: 642
Offline Offline

Gender: Male
Posts: 5489


Kevin


« Reply #9 on: February 02, 2011, 02:56:20 AM »

Glad to help.  AZSlot.com originally posted the fix (the first quote at the start of this thread), but it took me a while to figure out everything that he was saying.  Once I had gone through the process, I was able to spell it out a little clearer (at least for me) so that I had it documented (and was able to help a friend who needed to fix a couple of his games).

(For the record, my friend has started doing the dual fix that Clay posted, using a modified harness, to repair all of the potential power problems once and for all.  More involved than just the upper fix, but it'll make sure the machine will last a lifetime (and only require a very simple ATX swap in the future if it's ever needed).)
Logged

If you find this site helpful, please consider making a small donation to help defray the cost of hosting and bandwidth.

Please do not PM me for support or "how to" requests -- please post your request in the forum so that everyone may assist you and everyone can benefit from the answer to your question!  Thanks! Smiley
davebbpb
Guest
« Reply #10 on: December 07, 2012, 12:42:40 AM »

I'm trying to replace the lower power supply on my Big Bang piggy banking machine.
Logged
knagl
Global NLG Site Moderator
Sr.Tech NLG Member 1000+ Post
*

Total Karma Storms: 642
Offline Offline

Gender: Male
Posts: 5489


Kevin


« Reply #11 on: December 07, 2012, 04:43:19 AM »

I'm trying to replace the lower power supply on my Big Bang piggy banking machine.

Okay...?
Logged

If you find this site helpful, please consider making a small donation to help defray the cost of hosting and bandwidth.

Please do not PM me for support or "how to" requests -- please post your request in the forum so that everyone may assist you and everyone can benefit from the answer to your question!  Thanks! Smiley
mustangjeep
New NLG Member 1 to 100 Post
**

Total Karma Storms: 0
Offline Offline

Posts: 1


« Reply #12 on: November 14, 2013, 07:55:20 PM »

This is a great post with a ton of perfect fixes! I hope to get both my Piggy Bankin machine and my Stampede Deluxe fixed with this info!
Thank you!!!
Logged
Pages: [1] Go Up Print 
« previous next »
Jump to:  


If you find this site helpful, Please Consider Making a small donation to help defray the cost of hosting and bandwidth.


Newlifegames.com    Newlifegames.net    Newlifegames.org
   New Life Games    NewLifeGames  NLG  We Bring new Life to old Games    1-888-NLG-SLOTS
Are all Copyright and Trademarks of New Life Games LLC 1992 - 2021


FAIR USE NOTICE:

This site contains copyrighted material the use of which has not always been specifically authorized by the copyright owner.
We make such material available in an effort to advance awareness and understanding of the issues involved.
We believe this constitutes a fair use of any such copyrighted material as provided for in section 107 of the US Copyright Law.
In accordance with Title 17 U.S.C. Section 107, the material on this site is distributed without profit to those
who have expressed a prior interest in receiving the included information for research and educational purposes.

For more information please visit: http://www.law.cornell.edu/uscode/17/107.shtml.

If you wish to use copyrighted material from this site for purposes of your own that go beyond fair use,
you must obtain permission directly from the copyright owner.

NewLifeGames.net Web-Site is optimized for use with Fire-Fox and a minimum screen resolution of 1280x768 pixels.


Powered by SMF 1.1.20 | SMF © 2013, Simple Machines
Loon Designed by Mystica
Updated by Runic Warrior
Page created in 0.107 seconds with 21 queries.